Pages

Sunday 20 September 2015

My First Pocket Letter

I have recently joined in on a pocket letter swap with some lovely scrapbooking ladies. Its such a fun and fairly stress free swap. And it is lovely  to be connecting with other scrapbooking types since in my everyday life I don't know any other scrapbookers- scrapbook stores are quite a long way from here.
 Anyway on to the pocket letters. This one was a Heidi Swapp themed pocket letter, just my favorite scrapper! So I was excited to get started with this theme.
 I tried to keep it as simple as I could and left nearly everything for the recipient to be able to be taken out and used. Of course I added in a few little treats too!
 I did decorate the back  with a few bits and bobs including a letter with a little bit about me.
 When I wrapped up my letter I added a patty pan, a doily and some ribbon. All in my favorite colour combination right now- pink and gold with black and white!
I loved creating this pocket letter !
If you would like you can find out a lot more about pocket letters Here!

Tuesday 15 September 2015

Weekend Adventures

Its been all very exciting here recently because we bought a new car!!! Since we live in the country and we both have to travel long distances each day our car had done a lot of kilometers and it was time. My hubby was super excited to take our new car 'bluebell' out on her first easy 4 wheel drive adventure.
 We drove down to deep creek conservation park and then all the way down to blowhole beach- the last part was very steep driving (I hated it!!!) but we were rewarded at the end with a beautiful little beach!
 My boys loved this beach they are super keen to go back, Blake with his fishing gear and Luke with swimmers on! Blake was content to climb on and explore the rocks and Luke was happy playing at the waters edge and getting his clothes a little too wet!
 The weather was lovely it was one of the first few spring days here, so we were all keen to be out and about soaking up all the lovely sunshine!
Im looking forward to more adventuring in our new and more able car! if only I could craft in the car!!

Sunday 13 September 2015

180 Ornaments- August Done!

I just finished Augusts Ornaments so I guess I am a little behind on Septembers ornaments whoops! That's ok because I am coming to the end of the Ornament road. With August's ornaments done that only leaves me two more months of ornaments left! Not long to go, and I cant believe that I am nearly done, who knew I could make it this far!
 I'm really loving these little envelopes, they were nice to sew up. They have a cute little love heart on the back and they could hold a little something in them too. I had even thought about sewing up 25 of them so that I could use them for advent next year, they would be cute with a little note or message inside of them!
I am up to 152 ornaments now! The ornament basket is looking so full that I am going to have to find something larger to store them in! September ornaments are going to be something a little larger, when I was looking through the ornaments I wondered if some of them are a little small and might get a bit lost and not have a big impact on the tree so I am thinking that I will go with a simple shape and make it a bit larger, hopefully it will all look great on the tree- I'm getting a little nervous to see what its all going to look like!

Monday 17 August 2015

A little early christmas planning

Its no secret that I love everything about Christmas. I just cant seem to help myself, I love everything about it and just thinking about it makes me seriously happy. Whilst all year long  I have been madly stitching up  my 180 ornaments, it keeps Christmas right at the front of my thoughts and I have been dreaming up a tonne of fun crafty projects to make. In fact I have been working on them for some time now, I have a long list written on my kitchen window with a white board marker. And I am so glad that I have because there is no possible way that I could complete all this fun craftiness in the weeks leading up to Christmas and quite honestly I don't want to be trying to do everything at that time of year, it is busy enough then as it is!
Last year I wanted to have everything done by late November (see it here) it really made a huge difference that I had most stuff done but his year I would like to be done  little earlier. Really I know you are thinking that it is too early but seriously it is mid August already and its gone so fast!!! (129 days left!) There are a few things that I have been organizing already so that the end of year is a lovely enjoyable time and not a time when I am pulling my hair out. Here is a list of the first four things to think about that will help you get organised. I'm going to suggest that it is time to find a little note book or a spot in your planner where you can write a few things down, but first:

1. Decide on a Theme or Colour Scheme.
Ok so this is the fun part, may be you love to have a mish mash of christmas' gone by and that is totally fine, I think this is pretty typical for most Australians, we are a pretty laid back bunch but even if you are the kind of person that puts up a mixture of ornaments from years gone by, use that as your theme and put funky cut up cards on your pressies and add to your collection this year. If your more like me I LOVE to have a theme, my theme doesn't cover the entire house, yes I love to cover as much of my house as possible in christmassy goodness but I like to go with the flow in each room. Deciding on a theme or colour scheme can really help you. It really narrows down what to look for, what to buy, what not to buy and gives your Christmas a unique feel.
Of course the best place to find lots of inspiration is pinterest and you can see my list of Christmas themes here.

2. Make a list of Christmas gifts.
This is kind of obvious but its a really great way to reduce the stress! I hate shopping a Christmas time especially when you don't know what to get someone- I do love Christmas shopping when I have all my gifts done and I can enjoy the atmosphere and stay away from Christmas lines!  Its also such a money saver when you are not at the shops in a panic trying to madly find something special for someone special! So get started on that list and pop some gifts away, you'll be so happy you did!

3. Make a list of any handmade items you would like to make.
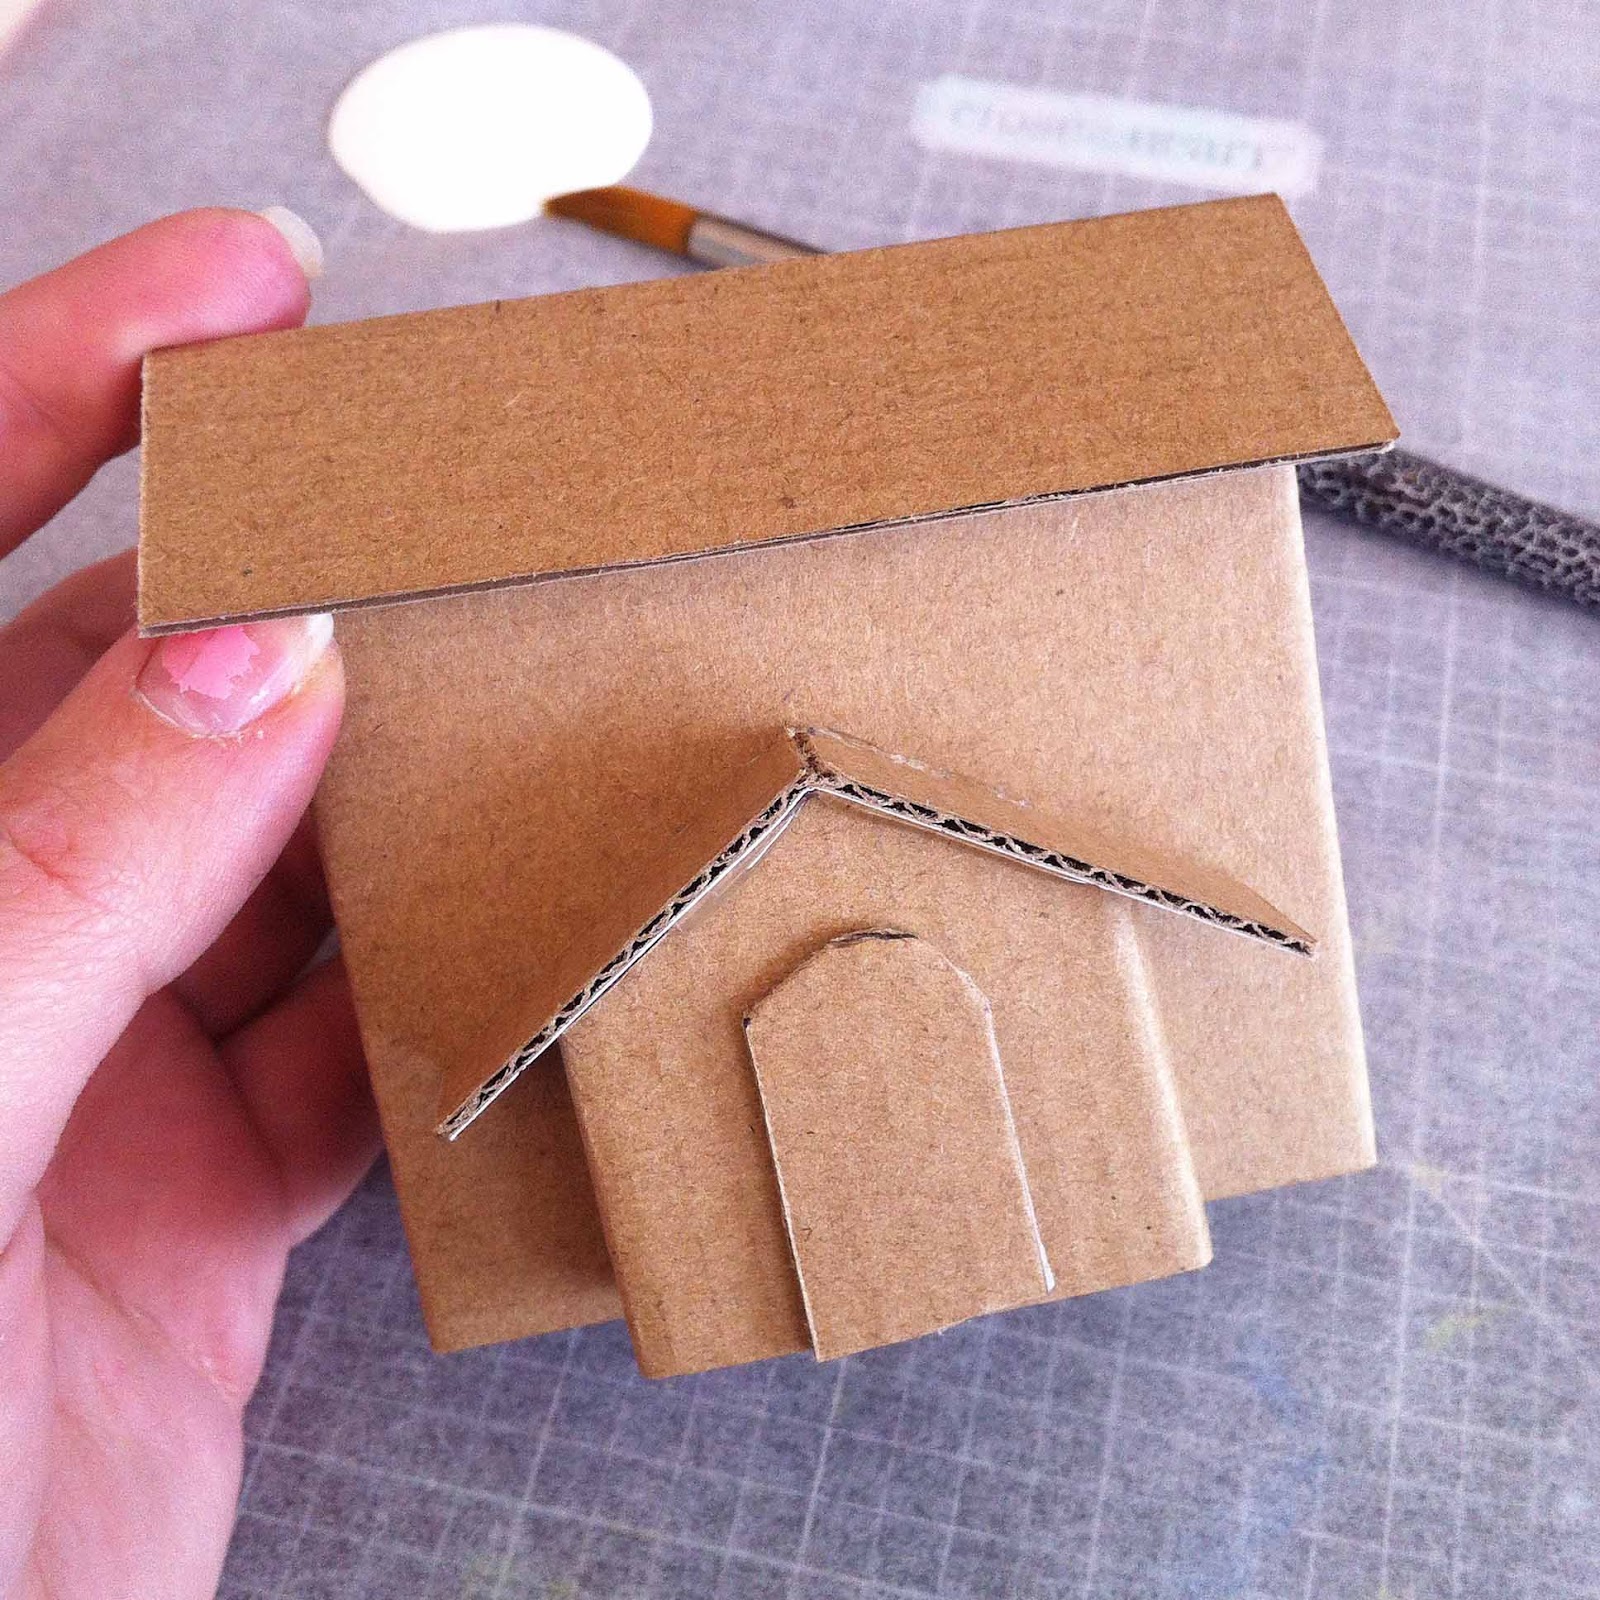
This year I am making a few small hand made gifts for friends and even these take time. If you leave it too late you just wont do it! Now is the time to get going on hand made gifts. I am also making lots of hand made decorations this year as well as my 180 ornaments I am also making some glitter houses to decorate my tree.

4. Organize your Advent Calendar.
Over the past few years my boys have enjoyed an activity and a chocolate on each day of advent, it makes the entire Christmas period so special and so fun!  They have requested to have the same again this year and they have also requested that there be more crafty activities in the mix this year. There are so so many amazing advent ideas out there you can see my advent pin board here. It pays to get this one out of the way early if you want to try something different or new because it can take a little time to plan and create. And really there is only just over 100 days until Advent begins :-)

I've bee so inspired by so many advent calendars so  made these advent bag houses for my boys. Each one contains a Project life card with an instruction to their activity and a chocolate each. Any crafty materials  or activity materials will be placed in the Advent house that I made last year (it's had an update!). My over all theme this year is winter wonderland. I'm creating lots of little houses for a village feel in my family room. And of course I am making lots of other bits and bobs I'll share here along the way. Hope this list helped you!


Saturday 1 August 2015

Snail Mail Outgoing

I recently created this snail mail for my pen pal. As I said in my last post I have been super inspired by all this cold weather here in Australia. And the theme for this Christmas is a winter wonderland. I am going to have lots of houses around the place. My pen pal asked me how my Christmas planning was going and well I just couldn't help but tell her all about it in this mail.
  I simply used some pens to draw on the box and wrote her address on the right hand side.
It opened up to have a little winter village inside. A little view of my Christmas plans :-)
 I created a pocket pouch to hold the letter by sticking two pieces of  white card together and cutting slits in the top piece to crate the pocket and then added a flower to the front that I had cut with my silhouette. 
 I put my letter in the left pocket, the plan in the middle and a pattern in the right. I also added in a photo copy of a pattern that I thought she might like.
I had really wished that I could have made something useful, my pen pal Sara makes me the most wonderful things that I can actually use, so I felt a little guilty sending something that is purely pretty, but it is also nice to have something pretty in the mail, I guess.
Of course it was lots of fun to make and I always love to sit down and read a letter from my pen pal- its such a lovely thing to do. So different from our more modern forms of communication! 

Friday 31 July 2015

180 Ornaments or 200 ornaments

 I had a moment recently: I wondered why I didn't I just make two extra of each ornament then I would have had 200? So I have gone back and I am hoping to make up to 200 ornaments!
 In the past few months I have made..... Birds
 Cupcakes
 Gingerbread Girls and Guys
 I think I have done about 136 all up. This is a photo of a lot of them but not all of them. 
There are Houses, Stockings, Hearts, Stars, Tea Cups, Birds, Cup Cakes, and Gingerbread people!
I'm thinking the next lot are going to be some reindeer, a baby deer may be?

Thursday 30 July 2015

Mamie Made Christmas: Getting Started

The last few months here have been a lot of fun crafting and there has been a lot of dreaming. Unfortunately my computer hasn't really been  up to the task of recording it all, I really need a new one but oh well it will have to wait! So while I have been away from the computer I have been thinking and planning for Christmas. What else is a girl to do in a freezing cold Australian winter??
 All this cold weather has inspired me to create a kind of winter wonderland village in my family room this Christmas. So I have begun lots of planning and lots of making so that I'm all organised to create a magical room come  Christmas time.This kind of thing takes lots of time so its great to be getting an early relaxed start on it!
 So far I have made a starry mobile to hang over our dining table and a wintery village to sit on the table directly under the starry mobile. I have also been thinking that some lights would look lovely hanging from the mobile too, we will see how we go. I am planning on buying lots of lights this year so I guess we will have to see how far the lights budget can stretch ;-)
As I finish each thing I have been popping them away with our Christmas decorations, I am hoping that when I pull them all out on decoration day I will surprise myself with how much I've done and also keeping a little bit of mystery so that when my boys see it all there will be an element of wonder for them!

Tuesday 16 June 2015

Snail Mail Out Going

I sent this a little while ago now but I thought I would still share it here, better late than never!
Recently I sent off another parcel to my pen pal Sara
 I had been wanting to make a felt envelope for so long and I finally found the time to do it. I loved making it and it is a fun way to keep some letters.
I also added in a blue felt tea cup because I knew that my pen pal Sara would like one. I have been thinking that this would look really cute in traditional Christmas colours of red and white so hopefully I can get around to making some for gifts.

  I added in some paperclips I recently found, some washi tape, a handmade stamp and of course the teacup and my letter.

I added some washi tape to the front and back of the package and popped everything inside and sent it all off.

Tuesday 9 June 2015

Mamie Made Stamps

I've recently been making my own little stamps, of course I was inspired by some lovely pictures on pinterest of beautifully carved stamps.
 I have done some lino cutting courses so I thought I would get out my old tools and give it a go.
When I went to find them of course I couldn't, so I bought some new ones. They are relatively cheap I think these three cost about $16 (find them here)and the rubber to make the stamps were $18(find that here) for an A4 piece or about $8 for a 10x10cm piece.  
 The only other things you'll need if you'd like to try our making your own stamps are a ruler, a stanley knife, a pen, a cutting mat (or a chopping board) and some stamping ink, which you can pick up cheaply at a news agent. If you have ever done any lino cutting you will find this much easier, the rubber is not as firm as lino so it is very easy to carve.
I've had fun carving tea cups, houses, envelopes and even some words but just remember if you carve words that you will need to carve them backwards so that they stamp the right way.
I am hoping to make lots more fun stamps to use for snail mail and cards.
Here is some from Pinterest that inspired me!

Tuesday 2 June 2015

Pictures from May

This May...
 There were presents wrapped
 There was chrysanthemums enjoyed
 There was some with tea.
 There was some reading of this lovely snail mail book by Michelle Mackintosh.
 There was a m and m covered birthday cake for my hubby.
 There was a game of mouse trap
 There was some sailing.
 There was some yummy food
And there was tea, always tea. 
It was especially nice in a pink sweetheart cup.

Wednesday 20 May 2015

The Evolution of Stars

I did happen to get super behind with my 180 ornaments I feel like it was mostly because I got stuck on March's stars.
I had really wanted to add in another colour but nothing really seemed to work or feel just right.
 I finally ended up making these plain stars and for now I am happy with them.
 I am still catching up with April's ornaments, I am nearly there with three to go. 
 Then I will be able to get a good go at getting Mays ornaments done before June arrives, although the months feel like they are whizzing by!

Monday 27 April 2015

Mamie + Blake Made: A Heat Pack!

I have  a handmade little heat pillow that I love to heat up and pop on my feet when I am crafting or watching a little TV. Its lovely but I have a problem, my little guy Blake is a cheeky little thief and loves to take it and use it for himself!
 So yesterday on our morning walk I noticed his jeans were about two inches too short (how do they grow so fast!!?) and we were having a discussion about recycling so we put two and two together and came home, grabbed some of his too short old jeans and made a heat pack for him.
 He is absolutely dying for me to make one for Luke too. If I don't make one today I think I will be in big trouble! He cut all the letters, then I sewed them on, sewed it together,  he added rice and I sewed it shut. Simple.
It is going with him everywhere at the moment! Hes been carrying it around on his head and even taking it in the car with us!

Saturday 25 April 2015

Snail Mail Outgoing!

Don't get me  wrong I absolutely love my boys, I love that they are adventurous, funny, cheeky I love that they just wanna be like there daddy, I love that they play together and love together and I love that I am the princess of the house since I am the only girl here. But many days lately, now that my boys are getting older and are able to do more fun adventurous things (and probably because they don't need me so much now) I wish that there was another girl in the house.
 So to help myself get a little girl fix I thought it would be cool to send a little snail mail to my nieces who are four and six. You know because its always exciting to get something in the mail. My boys LOVE getting things in the mail.
 So I found some stickers and Barbie chocolate coins the other day and they became the starting point for some girly snail mail. I popped the chocolate in the coral striped bags and stapled a Kaiser Craft project Life card on the front.
 I also made a little paper book with their names on that they can write or draw in. And I made some cards with some project life cards and wrote a little note in there.
This was such fun to put together and I am hoping that they like it, if they do I think there must be more snail mail girly adventures. It makes my heart happy to make fun cute girly things!